Binbiriz DevOps Procedures
Preliminary Preparation
- Decide what
xyzwill be in the subdomain (the subdomain to be used as dev), which will take the form dev-xyz.binbiriz.com, and write it down. - Host name or IP - Write down the hostname or the IP of the remote server.
- Decide on the username and password required for HTTP basic authentication to access the site, and write them down. The password must be 16 characters long. Secure Password Generator
Prepare a table like the one below in advance:

Creating the Dev Server / Site
Defining the Subdomain
- To define the subdomain, access the DNS management panel of the
binbiriz.comdomain. Digital Ocean Management Panel - The IP address of the dev server must be known in advance. For now, the server used as the dev server is the one hosted at Hetzner. Its IP address is
159.69.178.13 - Decide in advance which subdomain name will be used. In this example
dev-xyz.binbiriz.comwill be used. - From the menu, go to the DNS management page of binbiriz via the Networking Domains link.
- Then, in order:
- Select the
Arecord type. - Enter the subdomain, without the main domain, in the
HOSTNAMEfield. Make sure there are no spaces at the end or at the beginning. - Enter the IP address in the
WILL DIRECT TOfield. - Click the
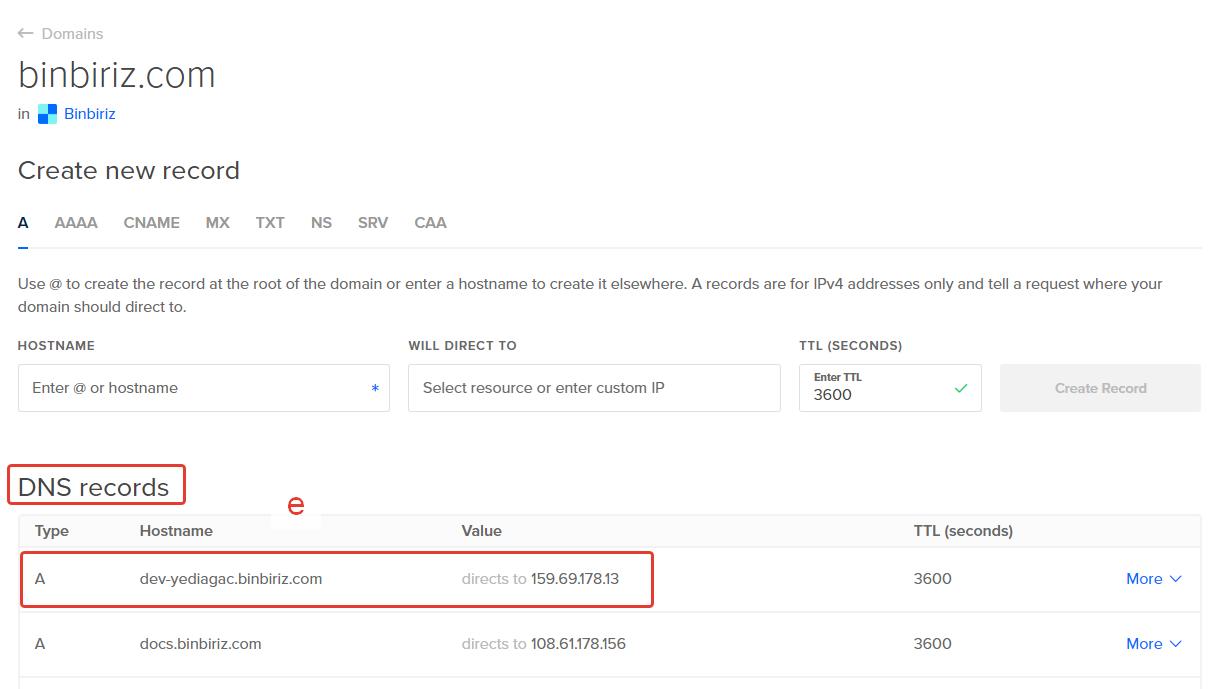
Create Recordbutton. - Make sure the record has been added to the
DNS recordstable.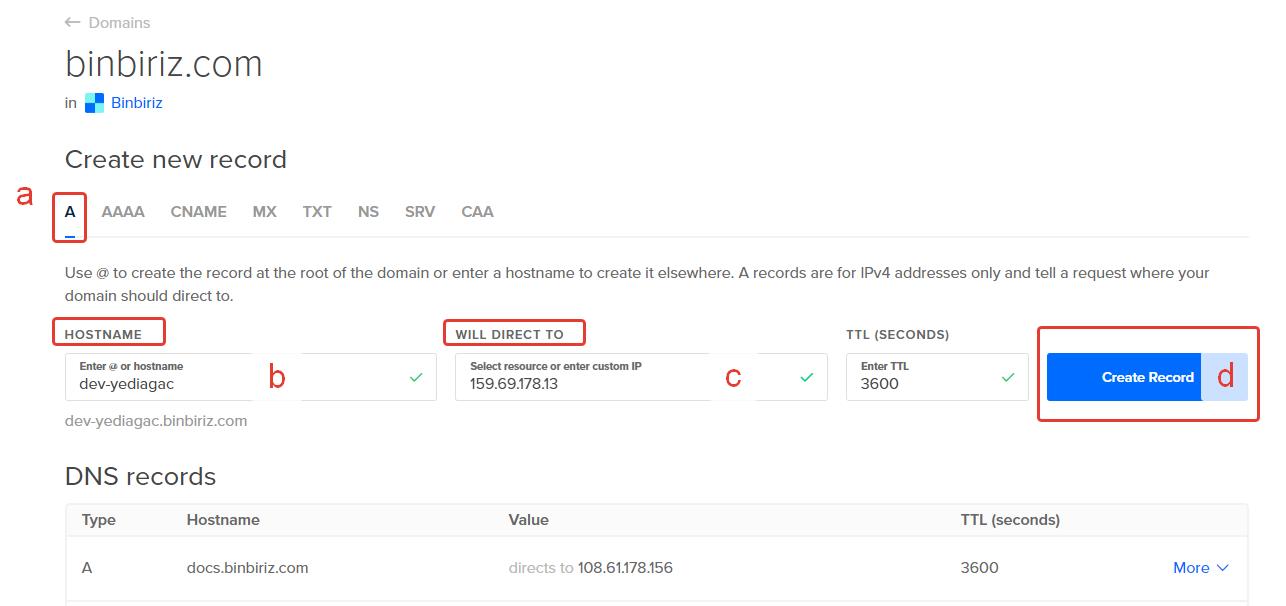
- Select the
Application Working Directory on the Server
The directory containing a web application such as Drupal 8, or web pages such as HTML, is called the
application working directory.
- In the terminal, access the server with
ssh [email protected]. - Create the site directory with
sudo mkdir /var/www/vhosts/binbiriz.com/dev-xyz.binbiriz.com. - Run the following two commands for the directory permissions:
sudo chown -R binbiriz:www-data /var/www/vhosts/binbiriz.com/dev-xyz.binbiriz.com
sudo chown -R binbiriz:www-data /var/www/vhosts/binbiriz.com/dev-xyz.binbiriz.com/
Creating the Apache Virtual Host File
Copy an existing Apache virtual host file to match the new subdomain name:
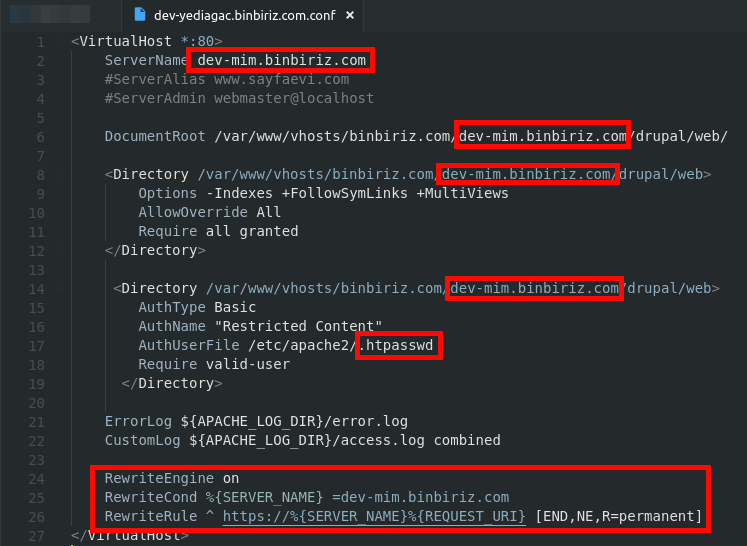
sudo cp /etc/apache2/sites-available/dev-mim.binbiriz.com.conf /etc/apache2/sites-available/dev-xyz.binbiriz.com.conf
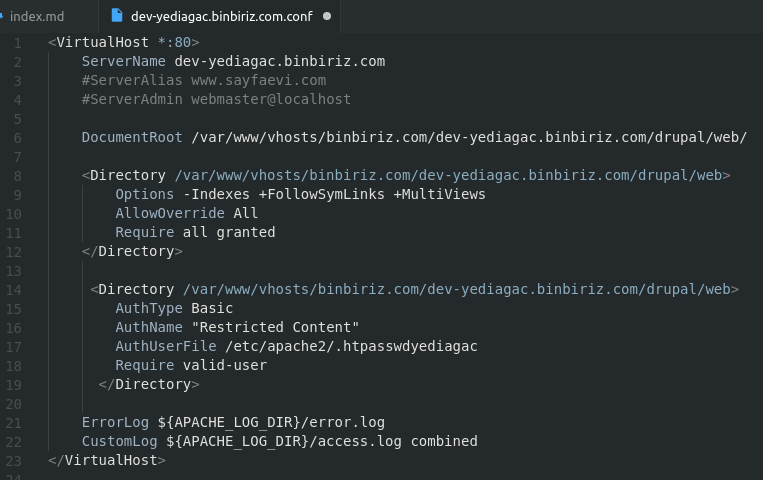
Delete the redundant parts in the file (marked in red), delete the 3 lines at the very bottom that are related to the rewrite rules, and save the file:
The final file should look like this:
Creating the HTTP Basic Authentication File
Run the following command to create a password file in the relevant place and add the username to it:
sudo htpasswd -c /etc/apache2/.htpasswdxyz dev-xyz-user
When this command is run, it asks you to enter a password twice. The first is to set the password for the HTTP Basic Authentication user, and the second is to verify the password you set.
The passwords used must be at least 16 characters long. https://passwordsgenerator.net/
Create the directory:
Put a test file in place:
echo "this is a test" > /var/www/vhosts/binbiriz.com/dev-xyz.binbiriz.com/drupal/web/index.html
sudo chown -R binbiriz:www-data /var/www/vhosts/binbiriz.com/dev-xyz.binbiriz.com
sudo chown -R binbiriz:www-data /var/www/vhosts/binbiriz.com/dev-xyz.binbiriz.com/
Enabling the Virtual Host in Apache
Visiting the Site to Check That It Works
Automatic Script for the Part Up to Here
*How the script works should be explained. This part has not been done yet. Screenshots etc. should be added.*
Installing the Let's Encrypt SSL Certificate
Run the following command and follow the instructions in the terminal:
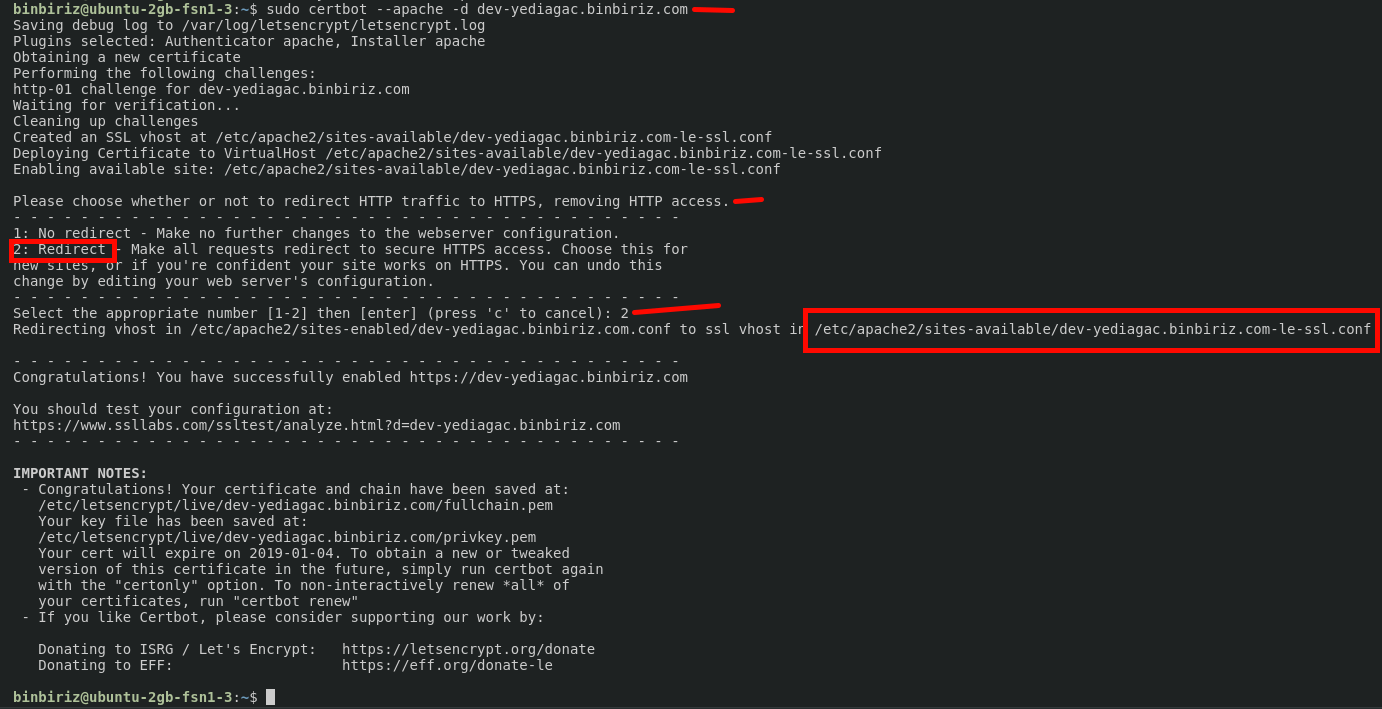
Let's Encrypt SSL certificates are valid for 3 months. To renew all the certificates on the server, you can run the
sudo certbot renewcommand. For certificate renewal, a crontab has been set up on the server as therootuser and it runs every Monday at midnight.
Check whether the site works with SSL:
Creating the Drupal VM
Creating a New Repository on Bitbucket
Create a repository named dev-xyz.
*This part has not been done yet. Screenshots etc. should be added.*
Pulling the Drupal VM Repository to Local
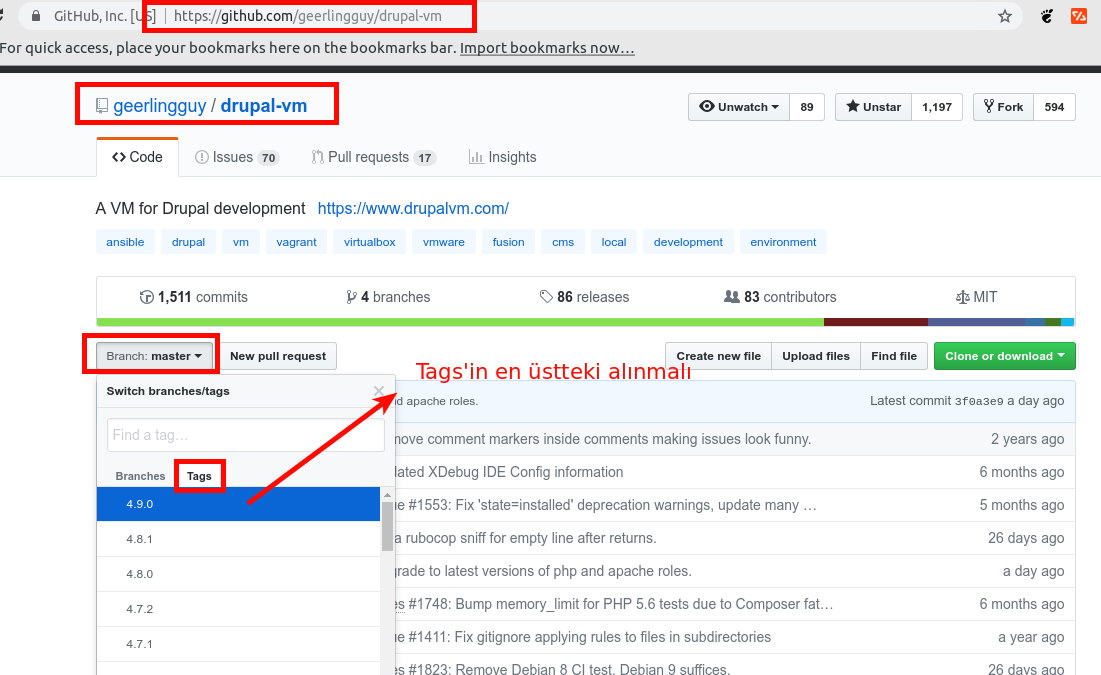
Before running the code in the section below, go to the Drupal VM GitHub page and look up what the latest
tagis.
cd /home/$USER/works
git clone https://github.com/geerlingguy/drupal-vm.git dvm-xyz
cd ./dvm-xyz

# Please proceed with the tag you got from the image above.
# You need to check out the latest tag in the repo.
git checkout tags/4.9.0

rm -rf .git/

# the VM's own readme.md is renamed.
mv /home/$USER/works/dvm-binbiriz/README.md /home/$USER/works/dvm-binbiriz/dvm-org-README.md
# create a git repo locally
git init
git add .
git commit -m "initial commit - tag 4.9.0 - detached"

#link the repo to the remote repo created on Bitbucket and push it
git remote add origin [email protected]:binbiriz/dvm-xyz.git
git push -u origin master

git tag -a github-detached -m "Detached state created by downloading from GitHub with checkout tags"
git push --tags
dvm: Before the First vagrant up
Prepare config.yml.
In the first step:
- To avoid conflicts, change these variables.
- Set these variables to true.
The final file should be included here as yml.
Fix the .gitignore in the repo root.
The final file should be included here as .gitignore.
git add .gitignore
git commit -m "gitignore file edited"
git add config.yml
git commit -m "config.yml file added"
Then run vagrant up
Fix config.yml.
git add config.yml
git commit -m "config.yml fixed after the first vagrant up so that D8 is not installed again."
git add .
git commit -m "D8 installed."
git push
git tag -a d8-first-installed-state -m "First installed state of D8 after vagrant up"
git push --tags
Notes:
- Then export the config with drush cex and make a single commit. (Exporting the configuration)
vagrant ssh
cd ..
drush cex --yes
exit
git add .
git commit -m "first configuration export via drush"
git tag -a first-config-exp -m "First drush cex while D8 is installed"
git push --tags
Then compare settings.php using meld and add the trusted host trusted_host_patterns. Around line 730, I think.
$settings['trusted_host_patterns'] = [
  '^yediagac\.local$',
  '^.+\.yediagac\.local$',
  '^binbiriz\.com',
  '^.+\.binbiriz\.com',
];
Uncomment lines 775, 776 and 777.
if (file_exists($app_root . '/' . $site_path . '/settings.local.php')) {
  include $app_root . '/' . $site_path . '/settings.local.php';
}
Put settings.local.php into ./drupal/web/sites/default/
cd /home/$USER/works/dvm-yediagac/drupal/web/sites
sudo cp example.settings.local.php ./default/settings.local.php
Compare settings.local.php using meld
No commit, because these files are in .gitignore
These are uploaded to the relevant place in open.project.
Then the file named development.services.yml is edited as follows.
Content
# Local development services.
#
# To activate this feature, follow the instructions at the top of the
# 'example.settings.local.php' file, which sits next to this file.
parameters:
  http.response.debug_cacheability_headers: true
  twig.config:
    debug: true
    auto_reload: null
    cache: false
services:
  cache.backend.null:
    class: Drupal\Core\Cache\NullBackendFactory
git add drupal/web/sites/development.services.yml
git commit -m "development.services twig debug configuration"
git push
Then set up the drush aliases.
Check the documentation to see whether this file is placed somewhere.
There are actually two drush alias files
drupal/drush/binbiriz.aliases.drushrc.php(placed manually)drupal/drush/sites/self.site.ymlThis file is generated by Drupal VM itself; changes are made to it.
- Put in the file to be placed manually and fix its content.
Edit the drupal/drush/sites/self.site.yml file.
Add the following.
dev:
  host: 159.69.178.13
  user: binbiriz
  root: /var/www/vhosts/binbiriz.com/dev-yediagac.binbiriz.com/drupal/web
  uri: https://dev-yediagac.binbiriz.com
  paths:
    - files: sites/default/files
README.md
#create readme.md.
touch /home/$USER/works/dvm-binbiriz/README.md
#write the documentation and the drush alias table
git add README.md
git commit -m "README.md file added for this project."
git push
Create the dev repo
Here the following note is added to the readme.md file
git add README.md
git commit -m "README.md updated."
git tag -a dev-branch-created -m "dev branch created"
git push --tags
Set the repository's default branch to dev on Bitbucket; this was done on 10.10.2018 at 08:30
Start: 15 Oct 2018 02:29
Deploying the Git Repository to the Server (First Deploy)
git repo to dev server
Access the server via ssh
cd /var/www/vhosts/binbiriz.com/
mv ./dev-binbiriz.binbiriz.com/ ./dev-binbiriz.binbiriz.com-old/
git clone [email protected]:binbiriz/dvm-binbiriz.git dev-binbiriz.binbiriz.com
cd ./dev-binbiriz.binbiriz.com/
git checkout dev
cd ..
rm -rf ./dev-binbiriz.binbiriz.com-old/
Creating an sql-dump on the local vagrant
# cd to vagrant folder
vagrant up
vagrant ssh
cd ..
mkdir -p /vagrant/.vscode
drush sql-dump --result-file=/vagrant/.vscode/sql_backup_to_dev_server_one_time_only_$(date +%Y%m%d_%H%M%S).sql
exit
Creating the Database on the Server
mysql -u username -p -e "CREATE DATABASE databasename CHARACTER SET utf8mb4 COLLATE utf8mb4_general_ci";
database creation
CREATE DATABASE dbname CHARACTER SET utf8mb4 COLLATE utf8mb4_general_ci;
#CREATE USER dbuser@localhost IDENTIFIED BY 'strong_password';
# GRANT SELECT, INSERT, UPDATE, DELETE, CREATE, DROP, INDEX, ALTER, CREATE TEMPORARY TABLES ON dbname.* TO 'drupal'@'localhost' IDENTIFIED BY 'strong_password';
GRANT ALL PRIVILEGES ON dbname.* TO 'drupal'@'localhost' IDENTIFIED BY 'strong_password';
Put the sql dump on the server
Into /home/binbiriz/scripts
restore sql dump
mysql -u dbuser -pstrong_password dbname < /home/binbiriz/scripts/sql_backup_to_dev_server_one_time_only_20181014_235131.sql
rm /home/binbiriz/scripts/sql_backup_to_dev_server_one_time_only_20181014_235131.sql
composer install and drush cim on dev
After the composer install command, there is no need to pay attention to the warning about sites/default/files. It is not actually a warning.
cd /var/www/vhosts/binbiriz.com/dev-yediagac.binbiriz.com/drupal
composer install
### put the settings.local.php files in their places
#put them in the /var/www/vhosts/binbiriz.com/directory_for_dev_domain/drupal/web/sites/default directory
#since setting.php is created by composer install, the credentials are now fixed in setting.php
##check this part carefully
drush cim
Check If the Site Is Working
Log in to the site and go to
admin/reports/status
There is an error like this. Ignore it, but look into it.
REBUILD ACCESS
Enabled
The rebuild_access setting is enabled in settings.php. It is recommended to have this setting disabled unless you are performing a rebuild.
Check it.
Especially the permissions of the settings.php file
chmod 644 sites/default/settings.php
Things to Put in the Project Planning Document
These are put on the first (description) page of the file.
deploy to server
On the dev server